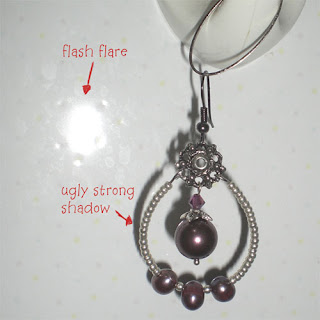
I've ranted a bit in the forums in the past on how sucky my pictures were since I only had an automatic digital camera. And since using flash clearly didn't work on taking good pictures, I tried to follow the suggestions people made about using indirect day light as the main light source. By using this technique, surprisingly, my pictures become a whole lot better! No flash flare on my jewelries and no harsh shadows under my objects.
TOOLS I used: an automatic digicam, a small desk/computer chair, background cloths/papers & various additional objects.
click image for bigger view
After a few tries, I found the best way to shoot my jewelry:
1. Use the Flower mode. In my automatic digicam, there are "Best Shot" modes where you can select different pre-set camera modes conditioned for different lighting situations and purposes. After a few experiments, I found that the Flower mode was the best because it is in macro setting, which:
a. Allows you to get close enough to the object, and
b. Has small focus range. so in the result, you'd get some part clear and some part blurry, which could be very artistic looking if you did it right.
2. Indirect sunlight is the best light source. Shoot your jewelry at your porch or next to your window. Shoot only when there's enough light that allows your camera to shoot without flash. In underexposure (not enough light) condition, your pictures would come as dark and very grainy. The alternative is to shoot outside when it's a cloudy day when the sun is hidden behind the clouds (= no indirect sunlight) or in the morning when the sun light is still soft. Noon is not the best time to have an outdoor photo shoot since the sun light is very strong the camera would indicate as overexposure.
How to focus and find out if there is enough light:
In my camera, when I half pressed the shutter button it would try to focus on the object. If there is enough light, there would be no flash icon coming out on the LCD screen. There's a rectangle image in the middle of the LCD screen that if you're too close to the object and camera is not able to focus, it would change color to red. If you're at a good distance, that rectangle would show in green. If there are too much light, the camera would also indicated as Overexposure or Underexposure if no sufficient light is detected. Overexposure is bad because the result image would look washed out and you'd miss a lot of the details of the object.
3. Alternative shot is in the afternoon around 3-4 pm. But in this hour, you would get reddish reflection on your jewelry. Long shadows would also at presence in outdoor shoot. You can however, reduce the reddish tone in a photo editing software.
How to maximize the use this Flower mode:
- First select the part you want it to be focused on.
- Bring the selected focus to the center of your LCD screen and half press the button until it beeps and showing a green sign (usually it indicates that the distance is ok, not too close to the object). Red indicates that you're too close (the whole piece could get blurry as the result if you insisted on taking pics).
- Once you found the focus, slide the camera slowly to the right/left/top/bottom until you get a good composition. Don't move it forward or backward because it would change your focus.
- Capture it :D
You don't need the best camera to take great pictures. My camera is certainly not the best, but i tried my best to make it work for my needs.
Example of results:
 <<< Using flash, just automatic setting. This picture above is not enhanced. Notice how the earring look flat and has harsh, ugly shadow on one side. Also the flash flare is not pretty for background.
 <<< Using day/window light, Flower setting (the sharp-blur effect only appears at something that has a far enough background). You can see that the focused part is only on a small part of it.
WARNING: Not good for picturing diamonds and other faceted precious/semiprecious stones if you want them to shine brilliantly. Please go to a professional jewelry photographer for that.
That's all folks! If you have any other tips to add, please share on the comments :D


hi again...just rec'd your email and thanks for the feedback...yes,resorted to the quicker way to "shoot" my jewelry by scanning...the art dolls are digital shots,not scanned,but not under best lighting conditions...basically was trying to get product in my shop quickly,but agree that i can do better....
ReplyDeleteyour tutorial is good and after many moons as a working photog i am well aware that lighting and clarity of focus are the 2 main things to be aware of ...yes,natural light is best especially when choose good perspective and exposure setting
cheers,gayle
http://artisangoodsbygayle.artfire.com