Friday, December 26, 2008

What are the goals of Artfire apart from being a better Etsy?

Someone asked this good question over Artfire Forum and here's the admin's answer:

So let's talk goals. This isn't a top down broadcast kind of discussion. This site is the first of its kind. We are engaged in community directed development a process that creates the foundation of the site and then opens the development process to the members to direct our growth, functionality, goals, mission and vision.

So here is the ideas we have and the goals we have set, these are open to input and feedback from the community.

1) We want to help sellers sell - no matter where. Using the following:

a) Education - teaching and mentoring new sellers and helping experts strive to improve through rich media lessons, expert consulting, third party support, and community mentoring.

B) Systems - creating a selling platform that is functional, simple, customizable and most importantly - fully integrating, to the best of our ability, your promotion and management of all selling sites through the artfire platform. We seek to be a hub that allows you to manage your business, no matter where you are selling.

C) Bringing Buyers - Reinvesting money from the site into buyer marketing. This will start on Internet sites and print channels, then shift to include broadcast, new media and more traditional channels. We intend to champion the handmade movement using all of our marketing and PR resources to shift this trend from micro to macro and create an environment where handmade buying is much more the norm.

D) Positively impact the planet and our fellow humans - cooperatively build a site that pools our indivdual resources, money, service, impact and creativity to improve our environment, help those less fortunate and support humanitarian efforts in research, education and the arts. By collecting and focusing a little from each of us we can make a dramatic impact in many of these areas.

E) Become the preeminent place on the Internet for artists and crafters to collaborate, partner, communicate and share via extensive, rich, functional community features and interaction points.

F) Create a self regualting, self supporting, self reliant community where each member can have both responsibility and interaction at a level that best suits them.

These are a just a start.

What else would you like to discuss?

i think they're gonna be good in the future, don't you think so? :D

Register on ArtFire.com

ArtFire - Buy Handmade - Sell Handmade

Monday, December 22, 2008

I WON!

My jewelry just won the first place of the monthly challenge in Starving Jewelry Artist Forum. Yay!! My first winning entry! I'm so excited :DDDDDD

The necklace called Mahadevi. It means The Great Goddess. Took me 14 hours to complete the set! It was completely handcrafted by me :)

See the other gorgeous entries here.


Photobucket
Photobucket Photobucket

Wednesday, December 17, 2008

Jewelry Photography Tutorial for Automatic Digital Camera

This tutorial is about maximizing the use of an automatic digital camera for us ordinary people with no expensive pro cameras. Take better pictures with your automatic digicam today! :)


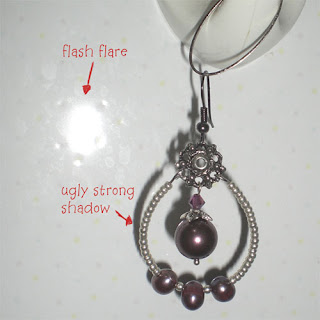
I've ranted a bit in the forums in the past on how sucky my pictures were since I only had an automatic digital camera. And since using flash clearly didn't work on taking good pictures, I tried to follow the suggestions people made about using indirect day light as the main light source. By using this technique, surprisingly, my pictures become a whole lot better! No flash flare on my jewelries and no harsh shadows under my objects.
 
TOOLS I used: an automatic digicam, a small desk/computer chair, background cloths/papers & various additional objects.
Photography supporting tools
click image for bigger view
After a few tries, I found the best way to shoot my jewelry:
1. Use the Flower mode. In my automatic digicam, there are "Best Shot" modes where you can select different pre-set camera modes conditioned for different lighting situations and purposes. After a few experiments, I found that the Flower mode was the best because it is in macro setting, which:
a. Allows you to get close enough to the object, and
b. Has small focus range. so in the result, you'd get some part clear and some part blurry, which could be very artistic looking if you did it right.
2. Indirect sunlight is the best light source. Shoot your jewelry at your porch or next to your window. Shoot only when there's enough light that allows your camera to shoot without flash. In underexposure (not enough light) condition, your pictures would come as dark and very grainy. The alternative is to shoot outside when it's a cloudy day when the sun is hidden behind the clouds (= no indirect sunlight) or in the morning when the sun light is still soft. Noon is not the best time to have an outdoor photo shoot since the sun light is very strong the camera would indicate as overexposure.
How to focus and find out if there is enough light:
In my camera, when I half pressed the shutter button it would try to focus on the object. If there is enough light, there would be no flash icon coming out on the LCD screen. There's a rectangle image in the middle of the LCD screen that if you're too close to the object and camera is not able to focus, it would change color to red. If you're at a good distance, that rectangle would show in green. If there are too much light, the camera would also indicated as Overexposure or Underexposure if no sufficient light is detected. Overexposure is bad because the result image would look washed out and you'd miss a lot of the details of the object.
3. Alternative shot is in the afternoon around 3-4 pm. But in this hour, you would get reddish reflection on your jewelry. Long shadows would also at presence in outdoor shoot. You can however, reduce the reddish tone in a photo editing software.

How to maximize the use this Flower mode:
- First select the part you want it to be focused on.
- Bring the selected focus to the center of your LCD screen and half press the button until it beeps and showing a green sign (usually it indicates that the distance is ok, not too close to the object). Red indicates that you're too close (the whole piece could get blurry as the result if you insisted on taking pics).
- Once you found the focus, slide the camera slowly to the right/left/top/bottom until you get a good composition. Don't move it forward or backward because it would change your focus.
- Capture it :D

You don't need the best camera to take great pictures. My camera is certainly not the best, but i tried my best to make it work for my needs.

Example of results:
<<< Using flash, just automatic setting. This picture above is not enhanced. Notice how the earring look flat and has harsh, ugly shadow on one side. Also the flash flare is not pretty for background.


<<< Afternoon pic, using Flower mode; under direct sunlight, long shadows.


 <<< Using day/window light, Flower setting (the sharp-blur effect only appears at something that has a far enough background). You can see that the focused part is only on a small part of it.


WARNING: Not good for picturing diamonds and other faceted precious/semiprecious stones if you want them to shine brilliantly. Please go to a professional jewelry photographer for that.


That's all folks! If you have any other tips to add, please share on the comments :D

Saturday, December 13, 2008

Follow Me on Twitter!

I have a Twitter now!! Twit twit twit ^3^


Follow me if you want to be the first to know about new products added in my webshops! Also get interesting random promotion!


See you :D


-K-

Friday, December 5, 2008

Artfire; Buy Handmade and Sell for FREE

Just recently i joined ArtFire.com. I heard about ArtFire.com from Starving [Jewelry] Artists Forum. I only heard good things about them so I thought "why not?".

What is ArtFire.com?
It's a Buy and Sell Handmade website similar to the widely known Etsy.com. So why would you want another? Because, Joining is FREE and Selling is FREE too! How awesome is that! Only with your free membership, there are some limitation such as you're only allowed to sell 10 items in your store at once and limited number of pictures uploaded for each item. However, for a free deal, that is not bad at all! NO COMMISSION FEE and NO LISTING FEE for each sale either! For Buyers, you can always join for free :)

Now, where would ArtFire.com get the money to fund their website? They have provided an option of paid membership of $20/month. Although it may sound a bit steep at first, but I can assure you that it's not expensive at all considering they only take that and NO MORE! NO listing fee, NO commission fee per sale, absolutely NOTHING MORE than that $20/month.

What could be better than that?

Ok, right now they're offering $7/month for 5,000 lucky members! That would last a lifetime as long as you didn't cancel your store. So quick! only 4,416 seats left the last time I checked! $7/month with absolutely no commission fee and no listing fee! I say it's a very good deal! Just compare it to my recently launched Etsy shop. I sold 7 items for the first 3 weeks and I already had to pay $12.12 to Etsy for commission and listing fee ($0.20 listing fee/item and 3.5% commission fee/item sold). So $7/month is a very good deal!

Want a FREE account FOR LIFE with unlimited access? Yes, you can! Right now they have a Referral Program that might get you a chance of Free Membership with unlimited access that only Paid Members got. Get another 10 people to join ArtFire.com to get your free membership! So, what are you waiting for? Quick! Register on ArtFire.com NOW! This offer doesn't last forever! Referral Program is only running until December 31, 2008.

Register on ArtFire.com NOW!

<3
-K-